
Arch Linux full disk encryption with key-USB
A short guide to full disk encryption with Arch Linux, using LUKS and a key-USB + decryption password.
Note: this guide is strongly based on information available on the ArchWiki. Doubts that may arose are likely solved there. The reader is assumed to be familiar with Linux; including
- Working on the command line.
- Booting from a Live USB and installing Arch Linux or similar.
- Using command line text editors like nano or vim.
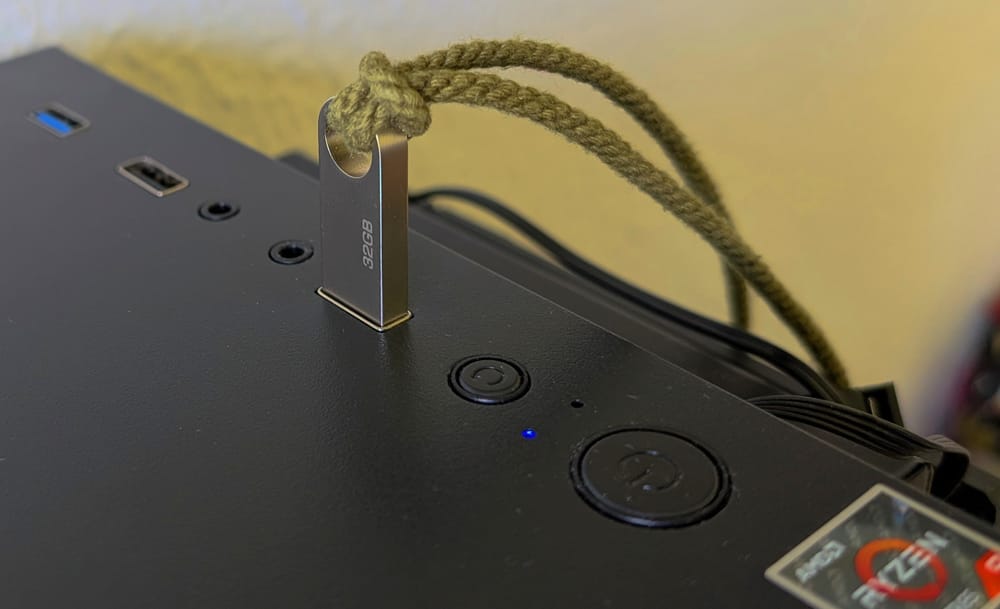
The following steps will guide you through a full disk encryption installation of Arch Linux with KDE Plasma as desktop environment. Wayland will be used as the display protocol, with SDDM (Simple Desktop Display Manager) as the graphical login manager. LUKS (Linux Unified Key Setup) will be used for encryption; however, it does not offer full disk encryption by itself, as it stores a plaintext header that is required for unlocking the encrypted volume. To circumvent this limitation, a key-USB will store both the detached LUKS header and the boot partition (GRUB + initial RAM filesystem + Linux kernel).
Therefore, the main disk in the computer will be fully encrypted, appearing as random, patternless data with no visible partitions—providing plausible deniability. The key-USB, however, will remain unencrypted. While encrypting the USB is possible, it is not covered in this setup.
A single LUKS container will be used. Within the container, there will be a LVM (Logical Volume Manager) volume group with three volumes: root, home, swap. LVM is chosen here over conventional partitions, since it solves most of its shortcomings and adds flexibility.
WARNING. Keep in mind that if the key-USB is lost or damaged, the data on the main drive will be lost forever. Consequently, having 1 or 2 extra cloned USBs is strongly recommended. The key-USBs should be in different safe locations. Preferably, none of them where the computer is kept. Since there is also an encryption password, having the key-USB does not directly grant access to the encrypted disk, but makes it easier for expert hands.
Materials:
- key-USBs. Three or four identic USBs to contain the boot partition and encryption headers. One USB is NOT enough, you will likely lose access to your files.
- Arch Linux live USB. You need another USB to install the system from.
- A computer. UEFI, 64bits processor... In other words, a standard modern computer.
Although not on the list, you should have plenty of time, patience and be curious. This is not the kind of process you want to rush or not fully understand.
Booting to Live USB
As with any Arch Linux installation, go to "https://archlinux.org/download/", download the ISO and burn it to a USB stick. Plug the USB, disable secure boot if needed, and boot into the USB. One of your key-USBs should also be plugged in, since the boot partition has to be installed there.
Once Arch Linux is started up, the very first thing is setting your keyboard layout. The command localectl list-keymaps will show all possible keyboard layouts. In my particular setup, I choose the Spanish layout and set the console font.
loadkeys es
setfont ter-132b
As stated before, it is assumed during this guide that you are on a UEFI system (most likely). To be sure, run the following command. It should return "64" or "32"
cat /sys/firmware/efi/fw_platform_sizeBefore proceeding, check your internet connection. If you are connected with an Ethernet cable or hotspot sharing via USB from your phone, this will probably work as is:
ping archlinux.orgIf no response is received, "Ctrl+C" it and connect to a WiFi network with iwctl:
iwctl # Will open an interactive prompt
[iwd] device list # To find your wireless device name
[iwd] device wlan0 set-property Powered on # Power on device if off
[iwd] adapter phy0 set-property Powered on # Power on adapter if off
[iwd] station wlan0 scan # Will start an scan
[iwd] station wlan0 get-networks # Will retrieve the scan results
[iwd] station wlan0 connect SSID # Connect to network (will ask for password)
[iwd] exit
ping archlinux.org
You should be receiving ping from archlinux.org. Then, update the system clock to avoid problems.
timedatectlPartitioning key-USB
Before preparing the main system disk, we format and mount the key-USB. The header will be placed there when creating the encrypted container. Here, 3 partitions are created for the key-USB.
- Partition 1: contains the boot partition
- Partition 2: contains the Arch Linux installation ISO (nice to have when something breaks).
- Partition 3: remaining of the disk, for storage. This is optional, since you should not go around using this USB for storage.
This is a proposed scheme, but just partition 1 is needed. Partitions 2 and 3 could also be a single partition, but I like them keep it apart. As stated, just make sure partition 1 is created. The rest is up to your needs. For instance, one could have more boot partitions, to use the same Key-USB to decrypt different computers.
The USB partitions are created with fdisk interactive console:
fdisk -l | less # Find your key-USB /dev/sdX
fdisk /dev/sdX # This will open the interactive console
g # Create a GPT partition table

n # New partition
1 # Partition number (default, may as well leave it empty)
2048 # Or empty (default value)
+1G # Set 1 gigabyte size
t # Set partition type
1 # Number for EFI partition tipe

n # New partition (for Arch Linux ISO)
.. # Leave empty (default)
.. # Leave empty (default)
+2G # Space required to contain the ISO
t # Set partition type
2 # to partition 1
1 # Number for EFI partition

n # A third partition for data (remaining of the space)
.. # Leave empty (default)
.. # Leave empty (default)
.. # Leave empty (default)

p # List partitioning to verify everything is correct
w # Write all changes
Partition 2 is marked as EFI so it is not shown as a usable partition from the computer once you are booted up. Now, the partitions have to be formatted:
mkfs.fat -F 32 /dev/sdX1 # Boot partition
mkfs.fat -F 32 /dev/sdX2 # Arch Linux ISO
mkfs.fat -F 32 /dev/sdX3 # Storage partition
The key-USB is ready to contain the headers and the boot partition. Even when partition 3 was left for storage, I do not recommend using this USB frequently for that purpose.
Once you are done with the whole installation process, you will need to go through those steps on your clone USB memories. Of course, you can do it now as well.
Encrypting and partitioning the main disk
To prevent cryptographic attacks or file recovery, a secure erase is performed on the full disk. This means that, after encrypting and installing the operative system, no residual data remains unencrypted. A simple and fast method is to encrypt the disk and then fill it up with zeroes. This will leave a random noise-like pattern on the disk, originated from the encryption algorithm.
cryptsetup open --type plain --key-file /dev/urandom --sector-size 4096 /dev/block-device to_be_wiped # Encrypt the whole disk
dd if=/dev/zero of=/dev/mapper/to_be_wiped status=progress bs=1M # Write all zeroes
cryptsetup close to_be_wiped # Close the container and forget about it
With the disk securely erased, the LUKS header and the encrypted container are created. You will have to introduce a password for decrypting the container later. I recommend to use simple English characters, since the US keyboard layout is enforced during boot.
dd if=/dev/zero of=header.img bs=16M count=1 # A 16MB header
cryptsetup luksFormat --offset 32768 --header header.img /dev/sdX
With the second command, an encrypted container is created on the disk /dev/sdX, leaving 16MB at the beginning to be able to reattach the header if needed in the future. The space is given in units of 512 bytes, so $512\;\mathrm{B} \times 32768 = 16777216\;\mathrm{B} \equiv 16\;\mathrm{MB}$
The container is opened and named, for example, "enc"
cryptsetup open --header header.img /dev/sdX encThe container name does not matter, as long as you are consistent and use the same name everywhere. This is time to move the header.img to the key-USB, or it will disappear when you finish the installation medium.
mount --mkdir /dev/sdX1 /mnt/boot # Key-USB, partition 1
mv header.img /mnt/boot # Now your header won't disappear
The proposed partition layout (based on the Arch Wiki) for the installation is as shown below
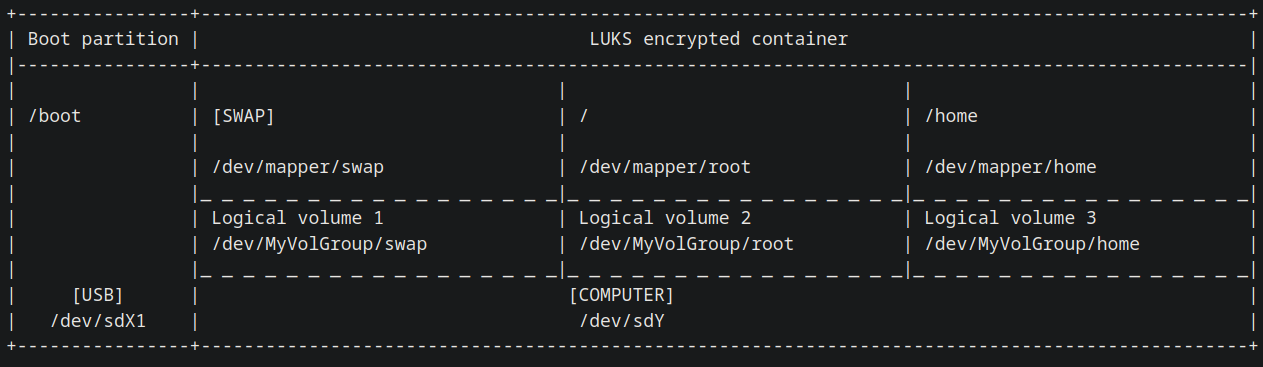
Time to create the LVM group and its volumes. The size specified for the root partition depends on your needs and, even when it is annoying, it can be resized later on. I gave mine 100G, but the 60G specified here should be fine enough.
pvcreate /dev/mapper/enc # Where enc is the name given before to the LUKS container
vgcreate MyVolGroup /dev/mapper/enc # Volume group is created
lvcreate -L 8G -n swap MyVolGroup # Volume for swap
lvcreate -L 60G -n root MyVolGroup # Volume for root (system installation)
lvcreate -l 100%FREE -n home MyVolGroup # Volume for home (user files and stuff)
With the volumes ready, we format them and mount them
mkfs.ext4 /dev/MyVolGroup/root
mkfs.ext4 /dev/MyVolGroup/home
mkswap /dev/MyVolGroup/swap

mount /dev/MyVolGroup/root /mnt
mount --mkdir /dev/MyVolGroup/home /mnt/home
swapon /dev/MyVolGroup/swap

mount --mkdir /dev/sdX1 /mnt/boot # Boot partition from USB as well
Everything is encrypted, formatted and ready to install the OS.
Installation of base OS packages
The system installation differs from the usual installation in the very end, when installing GRUB and generating the initramfs images. The rest will be quite standard. We start by getting the fastest mirrors with reflector:
reflector -p https --latest 10 --sort rate --fastest 5 --save /etc/pacman.d/mirrorlistThen, the core packages of Linux are installed to the target disk and the fstab is created with the partitions to be mounted at boot by the new system. Leave the microcode your computer uses (AMD -> amd-ucode, INTEL -> intel-ucode), since you don't need both.
## You don't need both variants, it is possible to choose between
## (linux + linux-headers) or (linux-lts + linux-lts-headers)
pacstrap -K /mnt base base-devel linux linux-lts linux-firmware linux-headers linux-lts-headers nano vim networkmanager openssh sudo amd-ucode intel-ucode
genfstab -U /mnt >> /mnt/etc/fstab
At this point, the root directory is changed to the system disk to complete the installation from the new system. After changing root, /home, and /boot need to be remounted. Remounting is important, since some packages will install files in /boot and we the unprivileged users will create files in /home.
arch-chroot /mnt # "/mnt" becomes "/" after this command

# /home and /boot are mounted again
mount /dev/base_lvm/home /home
mount /dev/sdX1 /boot # Boot partition from USB as well
Set the time zone of the system and generate related files
ln -sf /usr/share/zoneinfo/Region/City /etc/localtime # In my case Region=Europe, City=Madrid
hwclock --systohc
To ensure the hardware clock does not drift over time, it needs to be backed up periodically by NTP servers. To enable the NTP service, edit the file
nano /etc/systemd/timesyncd.conf
And insert the NTP server configuration of your choice, for instance,
[Time]
NTP=0.arch.pool.ntp.org 1.arch.pool.ntp.org 2.arch.pool.ntp.org 3.arch.pool.ntp.org
FallbackNTP=0.pool.ntp.org 1.pool.ntp.org 0.fr.pool.ntp.org
Then, we check the configuration and enable the service.
timedatectl show-timesync --all # Verify config
timedatectl set-ntp true # Enable service
timedatectl status # Confirm that everything ok
Now you will set your localization configuration. Your locales, the LANG and KEYMAP variables and your host name.
nano /etc/locale.gen # Uncomment your UTF required locales
locale-gen # Generate locales with the configured file

echo "LANG=es_ES.UTF-8" >> /etc/locale.conf
echo "KEYMAP=es" >> /etc/vconsole.conf
echo "yourhostname" >> /etc/hostname
Enable the NetworkManager, so you can connect to the internet from the new system in the first boot.
systemctl enable NetworkManagerBootloader configuration
GRUB bootloader will be used, with a couple of packages that will be necessary:
pacman -S lvm2 grub efibootmgrNow, we have to modify mkinitcpio.conf to include all necessary hooks to decrypt at boot. This approach is based on the sd-encrypt hook, rather than the encrypt hook.
nano /etc/mkinitcpio.conf # Modify so it looks like:

...
MODULES=(vfat)
...
HOOKS=(base systemd autodetect microcode modconf kms keyboard sd-vconsole block sd-encrypt lvm2 filesystems fsck)
...
By the way, the order of the HOOKS matters, so do not misplace them. Do not modify any other line.
Another critical configuration is the crypttab.initramfs file that will be used within the initramfs at early boot. This needs to be configured so it can find the header file and the target disk to decrypt. So, find the identifiers of the key-USB and the main OS disk, and write it to the /etc/crypttab.initramfs file (note this is not the usual crypttab file, but the initramfs version of it).
blkid /dev/sdX1 # key-USB, partition 1 (boot partition)
ls -l /dev/disk/by-id/ # Find the corresponding to your system disk

echo "enc /dev/disk/by-id/nvme-Samsung... none header=/header.img:UUID=1234-ABCD..." >> /etc/crypttab.initramfs
Remember that "enc" was the name we gave to the decrypted container. Now, run mkinitcpio to make the configuration effective, install grub to the key-USB and generate the grub configuration file.
mkinitcpio -P
grub-install --target=x86_64-efi --efi-directory=/boot --removable
grub-mkconfig -o /boot/grub/grub.cfg
Take a moment to check that all the above was done properly, so you get the system to boot fine. Re-check the disk UUID, IDs...
User configuration, essential packages, GUI...
The critical steps are over, but there are a lot of important configurations to settle. For instance, setting a root password and creating a non-root user.
passwd # Root password
useradd -m username # Non-root user
passwd username # Non-root user password
usermod -aG wheel username # Add it to wheel group

pacman -S sudo vi
visudo # To allow the non-root user to use sudo, uncomment the line:

"# %wheel ALL=(ALL:ALL) ALL"Tip: when setting the non-root user password, start with something easy. Sometimes, the login screen starts with US keyboard layout, so try to stick to US keyboard layout until you login the first time.
To enable 32 bit packages support, you can uncomment the following lines in /etc/pacman.conf
...
[multilib]
Include = /etc/pacman.d/mirrorlist
...
And, at last, install most essential packages for the graphical interface and some basic utilities like libreoffice or firefox. If your NVIDIA card is not within the requirements commented in the code below, consult the ArchWiki for NVIDIA. You will have to replace the package nvidia for the correct one.
# Get fastest mirrors in the new system as well
pacman -S reflector rsync
reflector -p https --latest 10 --sort rate --fastest 5 --save /etc/pacman.d/mirrorlist

pacman -S bash-completion git # Nice to have
pacman -S noto-fonts noto-fonts-extra ttf-bitstream-vera ttf-dejavu ttf-droid ttf-liberation ttf-opensans ttf-roboto # Fonts
pacman -S ntfs-3g exfat-utils dosfstools # Extra filesystem compatibility

# Graphic drivers (if NVIDIA GPU) RTX 3000 or newer
pacman -S nvidia-open-dkms nvidia-utils lib32-nvidia-utils nvidia-settings

# Graphic drivers (if AMD GPU)
pacman -S mesa lib32-mesa vulkan-radeon lib32-vulkan-radeon

# Plasma installation (and recommended packages)
pacman -S baloo-widgets dolphin-plugins ffmpegthumbs kde-inotify-survey kdegraphics-thumbnailers kdenetwork-filesharing kimageformats kio-admin kio-extras kio-fuse kwalletmanager qqc2-desktop-style
pacman -S icoutils power-profiles-daemon switcheroo-control xdg-desktop-portal-gtk xsettingsd

# For a basic installation use plasma package. Use plasma-meta instead for a full-fledged installation
pacman -S plasma

# Some basic apps (add whatever else you need)
pacman -S firefox libreoffice-fresh vlc konsole
Enable SDDM service for the graphical login screen, exit from /mnt, umount everything and reboot to the new system.
systemctl enable sddm
exit
umount -R /mnt
reboot
If everything went smooth, you should see the GRUB bootloader, the prompt where you have to introduce the encryption password and, eventually, the SDDM log in screen.
Final tweaks and key-USB cloning
Log in with your non-root user and start using your new system. Probably you will need some time to set up everything and fix small issues that you will encounter in the beginning. I recommend to change the welcome screen in KDE Plasma settings, instead of the old fashioned welcome screen you just saw.
Finally, set the keyboard layout for the login screen and change your non-root user password to something safer. Reboot and check if it worked.
localectl set-x11-keymap es # Spanish in my case
passwd
There are a couple of last things that you might want. First, if you have a SSD, enable the periodical TRIM service to improve its performance and lifespan:
sudo systemctl enable fstrim.timer
sudo systemctl start fstrim.timer
Second, if you want to install unofficial, community supported packages, install YAY to manage them:
git clone https://aur.archlinux.org/yay.git # Download source code
cd yay/
makepkg -si # Compile the package
yay -Syu --noconfirm # yay command to update system using default options
You can research a bit about yay, but it helps installing many packages that are not on the official repositories. This meaning, that they are not available via pacman. The command syntax is quite similar to pacman but not completely.
When yay compiles a package, it may take quite long, since by default it uses just 1 CPU thread. Luckily, you can edit the file /etc/makepkg.conf modifying the line starting with MAKEFLAGS to add more CPU cores. Uncomment that line and replace the number there for your number of CPU threads.
USB. Making it "live" and cloning it
Since one of the USB partitions contains the Arch Linux ISO, we will add an entry to the GRUB menu that allows to boot from the Live ISO as well, not just the main system. This is particularly useful when you forget to mount the Key-USB before updating Kernel related packages and break the boot partition. Having the Live USB in the Key-USB allows to boot from it, decrypt the main system (since the LUKS header is in this same USB) and fix the boot partition.
To add a new entry that boots from the .iso file, we will use GRUB's loopback feature. GRUB's configuration file /boot/grub/grub.cfg is generated automatically when upgrading some packages, so that is not a safe place for any custom code. However, it is possible to add a custom file /boot/grub/custom.cfg, that is designed for this specific purpose. grub.cfg will always search for a file named custom.cfg and append its content. The code in custom.cfg can be the following:
menuentry "Arch Linux ISO" {
    insmod part_gpt
    insmod fat
    insmod iso9660
    insmod loopback
    insmod search_fs_uuid

    search --no-floppy --fs-uuid --set=iso_partition EC88-6C69
    set isofile="/archlinux-x86_64.iso"
    loopback loop ($iso_partition)$isofile
    linux (loop)/arch/boot/x86_64/vmlinuz-linux img_dev=/dev/disk/by-uuid/EC88-6C69 img_loop=$isofile earlymodules=loop
    initrd (loop)/arch/boot/x86_64/initramfs-linux.img
}
Note that the Arch Linux ISO file name has to match with the one specified there. In this case "archlinux-x86_64.iso". Additionally, the UUID of the partition containing such ISO file has to match with the one specified in this file "EC88-6C69". This appears twice in the file. The partition UUID can be found with
blkid /dev/sdX2 # Where this is the USB partition with the ISOAs mentioned earlier, probably you want to clone your key-USB to have a spare one. Make sure the USB is unmounted and you specify correctly the origin and target of the copy. It would be rather sad to destroy the header.img now...
I recommend creating the partitions in the clone USBs as was done with the original key-USB. Then run the following command for all the partitions you have except the data partition. This will result in identical labels for the cloned partitions, so all the configuration done for the original key-USB will work with the clones.
# Supposing /dev/sdb1 is the origin and /dev/sdd1 is the new "clone"
dd if=/dev/sdb1 of=/dev/sdd1 bs=64M status=progress # Boot partition
dd if=/dev/sdb2 of=/dev/sdd2 bs=64M status=progress # Arch Linux ISO partition
The End
So, that was it. I hope it was helpful and you have your new system working and fully encrypted. Be curious, learn and take care of your USB!
IMPORTANT. Make sure the key-USB is plugged in and mounted in /boot when performing a full system upgrade that upgrades the Linux Kernel packages. Not following this advice could cause some problems on next boot and you might have to boot "manually" form the Arch ISO live image and fix the system. You won't lose information, but you will have to boot from the Arch Linux live USB, unencrypt the partition, mount it to /mnt and repeat the installation of the Linux Kernel from this guide. Not awful but not fun.
Another "inconvenience" is that, if you just update the files in the main key-USB when performing system updates, the clones will contain older kernels and initramfs files. This means that, if you lose your main key-USB, you will have to plug one of the clones and use the Arch Linux ISO GRUB entry. Essentially, you will go through a small part of this guide again.
From the Arch Linux live ISO, decrypt the system partition manually, mount the unencrypted root partition in /mnt and chroot into it. Once there, mount the /boot partition and reinstall the packages that have outdated files in this key-USB
# If you use just the -lts version, remove linx and linux-headers
# If you use just the standar variant, remove the lts packages...
pacman -Sy linux linux-lts linux-firmware linux-headers linux-lts-headers

mkinitcpio -P
# Not sure if these last two lines are needed, but why not
grub-install --target=x86_64-efi --efi-directory=/boot --removable
grub-mkconfig -o /boot/grub/grub.cfg
Basically, this installs again everything to the key-USB, so its contents match the proper version of the installed packages.